When selecting which Dye or Powder to use on a fingerprint sample first, Check the Background for Fluorescence prior to treatment. If background fluorescence is present in a particular region of the spectrum, choose treatment with a response that does not coincide with background response. If a background and treatment interaction is suspected, attempt a test on a portion of the sample where evidence is least likely to show up.
An example would be If UV300-400 makes background fluoresce (Poor contrast), then go to Blue (CSS/450nm).
When backgrounds are concerned a general Rule of Thumb is; The longer the wavelength of illumination, the smaller the number of backgrounds will fluoresce, therefore, select treatments that you can excite fluorescence at longer wavelengths.
As an example; When going from UV to 450nm, then use: Basic-Yellow instead of Ardrox. Red/Green powder instead of yellow powder.
For Through the Lens (TTL) metering, make sure the proper camera filter for the application is attached to the lens first. For remote metering, make sure chosen filter is in front of meter.
It is possible but rarely will the Varying the angle of the illumination affect contrast / details. A couple of examples; on Rough, textured surfaces may require illumination by light source perpendicular to the sample to avoid interference from the textured background (shadow) and on Superglue fumed ridges PRIOR to treatment may require parallel illumination similar to scatter techniques, to show bright ridges / dark background.
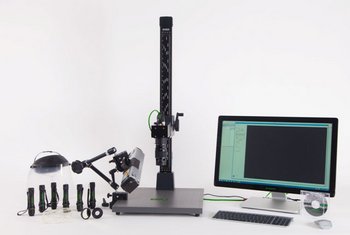
When taking images of fingerprints it is always recommended to use a Stable Tripod or copy stand. Using a Shutter release cable is helpful as it allows safe long exposure time with High F/#’s.
Always use a rule and highlight scale (in orange/red, not yellow)
And those of you still using film, it is recommended to use a speed of ASA400 or slower. You may be tempted to use higher speeds to reduce your exposure times but above ASA400 the film grain becomes visible and it may interfere with details of the fingerprint.
Do you have any questions or requests? Use this form to contact our specialists.